|
"Had
I been present at the Creation, I would have given
some useful hints for better ordering of
the Universe."
ALFONSO THE WISE,
KING OF CASTILE
Now that you have mastered playing
Empire Deluxe Internet Edition its time to create custom worlds and
scenarios. The Game Editor lets you do this. You may create specific
scenarios with set cities and units already on the board. You may create
scenarios from the pages of history or out of your own imagination. You may
also limit the types of units that can be produced during a given scenario.
The scenario editor will also allow you to select certain sighting rules used
in a game.
GETTING STARTED.
To get
into the Game Editor, select on of the options in the Game Editor
button from the main menu.
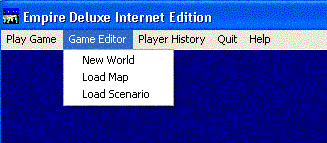
Game Editor Options
New World - This
option allows you to create a world from scratch. After you select this
option you will be given the World Options Menu and the user may build a new
world, as described in the GETTING STARTED section of “Playing the Game”
Load a Map - This
option calls up the File Requester and allows you to load an already created
world into the Game Editor for modifying.
Load a Scenario -
This option will call up the File Requester and allow you to load an already
created scenario into the Game Editor.
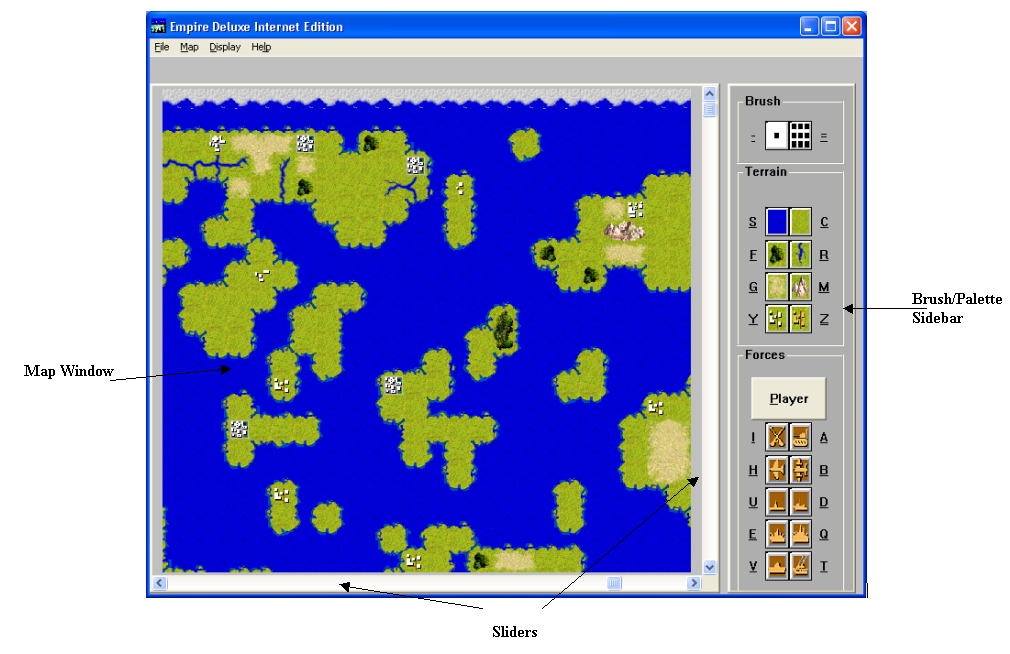
Game Editor
Screen
The Game
Editor appears much as the game screen does when playing Empire Deluxe
Internet Edition. The map you are editing will be located in the center
portion of the screen. If the entire map is not visible, you may scroll
around it using the slide bars on the side. At the top of the screen is the
Menu Bar that you may access the same way you did when playing the game. To
the right of the screen are the brushes and palettes you may use to create
your own worlds.
The menus
used in the Empire Deluxe Game Editor are similar to those used when playing
the game:
The file
menu gives access to the various file manipulation controls used in the Game
Editor. There are five options under the File Menu.
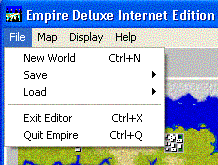
File Menu Options in the Game
Editor
File-New World
[Ctrl + N] - This option removes whatever world you are currently
working on and allows you to create an entirely new one. If you have not
saved the current world, you will be prompted to do so.
File-Load – The load
option allows you to load a map File-Load-Map [Ctrl + L] or scenario
file File-Load-Scenario.
File-Save - The save
option allows you to save the world or scenario you are currently working
on. You may save a map File-Save-Map [Ctrl + S] or scenario
File-Save-Scenario. If save a map is chosen, only the terrain designed
and map dimensions will be saved, not the units or ownership of cities.
Saving as a scenario allows you to save the terrain features and all units
and city ownership you have selected. In addition, you will be able to
select certain rules that will apply to that scenario and you can attach a
text description to the scenario.
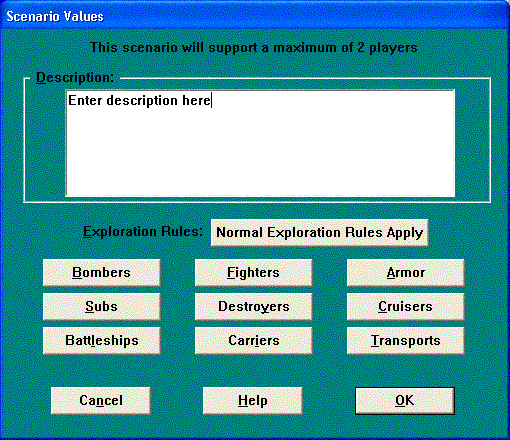
When you
save or load a scenario you will see the Scenario Values screen shown below:
Scenario
Values Screen
This
screen will allow you to set various options for the scenario when you are
saving it; and view, but not change, the various set options when loading
one.
Description - The
description section allows you to add text to describe the scenario to
would-be players. You can add up to four lines of text for this purpose.
Exploration Rules
- This button allows you to set the sighting rules for the game. The
basic setting is for the standard rules where all terrain and units are
invisible until sighted. You may also choose for all terrain to be
visible but not the units, or for both units and terrain to be visible.
The former option works well for historical scenarios.
Units - Below the
Exploration Rules are buttons for each of the units available in the
game. Selecting one of these buttons will turn off or on the ability for
cities to produce that type of unit when playing the scenario.
Cancel - This
option exits out of the Scenario Values screen and returns you to the Game
Editor, the Game Editor Menu or the World Options Menu.
Help - This
option calls up the manual.
OK - This option
accepts the current settings and continues on with either loading or
saving the scenario.
File-Load [Ctrl +
L] - The load option will call up the File Requester and allow you to
load either another world or another scenario into the Game Editor. If you
have not already done so, you will be prompted to save the map you are
currently working on.
File-Exit Map Editor
[Ctrl + X] - This option exits the Game Editor and returns you to the
Game Options menu. You will be prompted to save any currently unsaved work
when you do so.
File-Quit Empire
[Ctrl + Q] - The quit option takes you out of Empire Deluxe Internet
Edition and returns you to the operating system. You will be prompted
to save any maps you have not already saved.
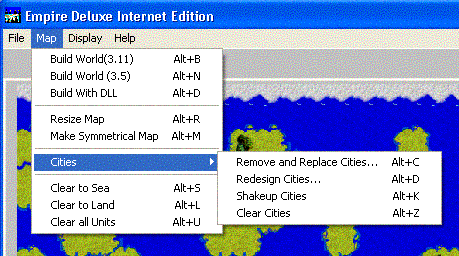
The map
menu contains options for the actual creation and modification of a world.
The options under it are:
Map-Build World (3.11)
[Alt + B] - This option generates a random world in the same manner
Empire Deluxe Internet Edition would when a “Generate Random World v
3.11” options selected for playing a game. However, the size of the map was
determined previously and will not change. You will need to use the
Resize Map option for this. You may then edit this world as desired.
Map-Build World (3.5)
[Alt + N] - This option generates a random world in the same manner
Empire Deluxe Internet Edition would when a “Generate Random World v
3.5” options selected for playing a game. However, the size of the map was
determined previously and will not change. You will need to use the
Resize Map option for this. You will then see the Map Factors Screen:
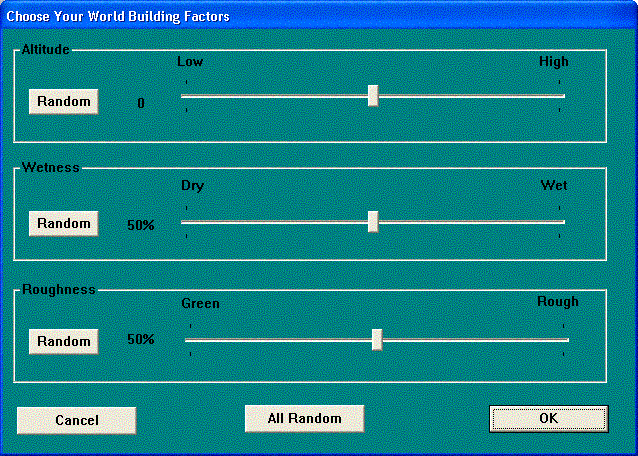
Map Factors Screen
Here you
will choose the values for Altitude (-100 to 100), Wetness (0-100), and
Roughness (0-100). All of these factors are used in the World Building
algorithm. Bear in mind the World Building Algorithm was not designed for
such tweaking, so your results may not be as expected. You will need to
experiment with the settings to find the results you desire. All Random will
randomize the three factors within their associated ranges.
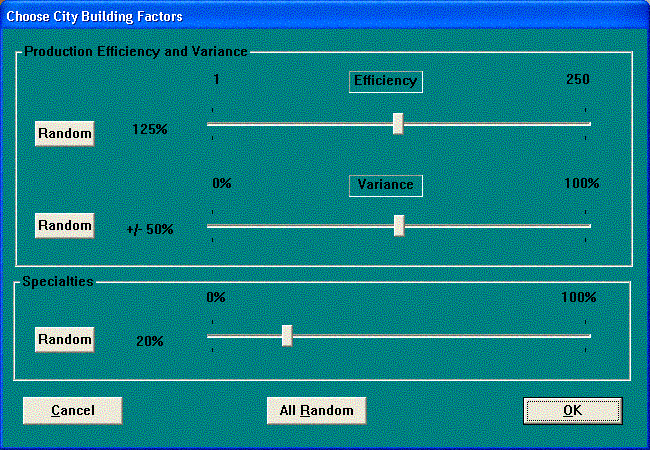
After
the map factors have been selected, the City Building Factors must be
chosen.
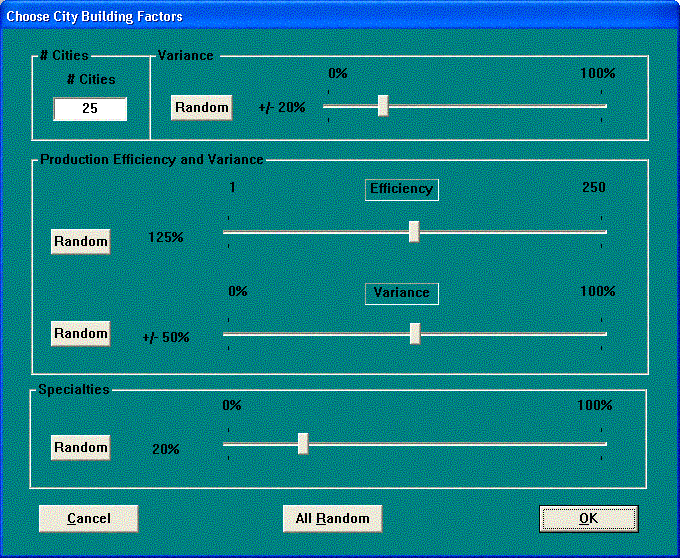
City Building Factors
# Cities – This is
where you will specify the base number of cities you would like on the
map. You may then vary it up to +/- 100% by setting the Variance
value to the right. The range of number of cities can be between 0 and
32,500.
Production Efficiency
and Variance: This is where you will specify the average production
efficiency (Advanced Game) and the amount by which it will vary.
Specialties – this
is where you will specify the percentage value of cities that will have a
production specialty (Advanced Game).Be aware that this is calculated
statistically, so the resulting number of cities with production
specialties may not be exactly as you desired.
All of
the values except for # Cities can be randomized by selecting the
associated Random button. If randomizing all values is desired, use
the All Random button.
After the
city building factors have been chosen, the world will be constructed. You
may then edit this world as desired.
Map-Build With DLL [Alt
+ D] - This option generates a random world in the same manner Empire
Deluxe Internet Edition would when a “Generate Random World With DLL”
options selected for playing a game. Upon selecting this option, the user
will specify Map Factors and City Building Factors as described above in
Build World (3.5). These values will then passed to the DLL for
processing. The creator of the DLL may choose to ignore these values
altogether or possibly use them to represent different concepts. It is up to
the creator of the DLL to accurately describe the expected results of the
DLL’s World Building. If the DLL successfully builds a world, you may then
edit this world as desired.
Map-Resize Map [Alt + R]
– choosing this option will allow you to
change the width, height, and wrap value of the map, using the Map Size
Dialog. The current terrain will be preserved, though some terrain may be
lost if the map is resized to a smaller width or height than before.
Map-Make Symmetrical Map [Alt + M] – Selecting
this option will allow the user to make a symmetrical or “mirrored” map of
the current map. The user will choose how to make the new map based on the
old one from the Symmetrical Map Method Dialog.
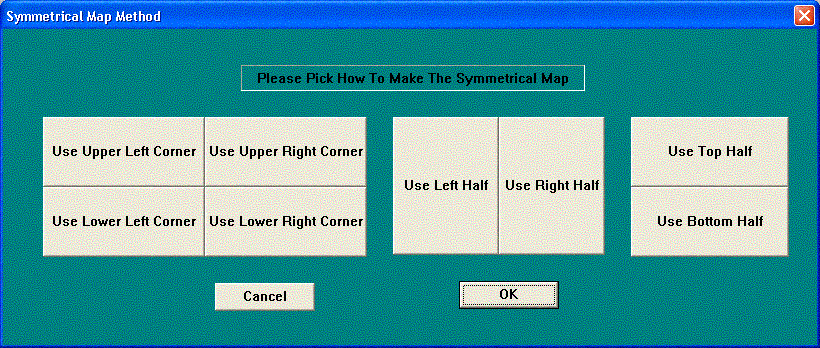
Symmetrical Map Method Dialog
In the Symmetrical Map Method
dialog, the user will choose which half or quarter of the current map he
would like mirrored. Upon making a selection, the map will be generated.
Below is an example of an Upper Right Corner Map and a Left Half map:
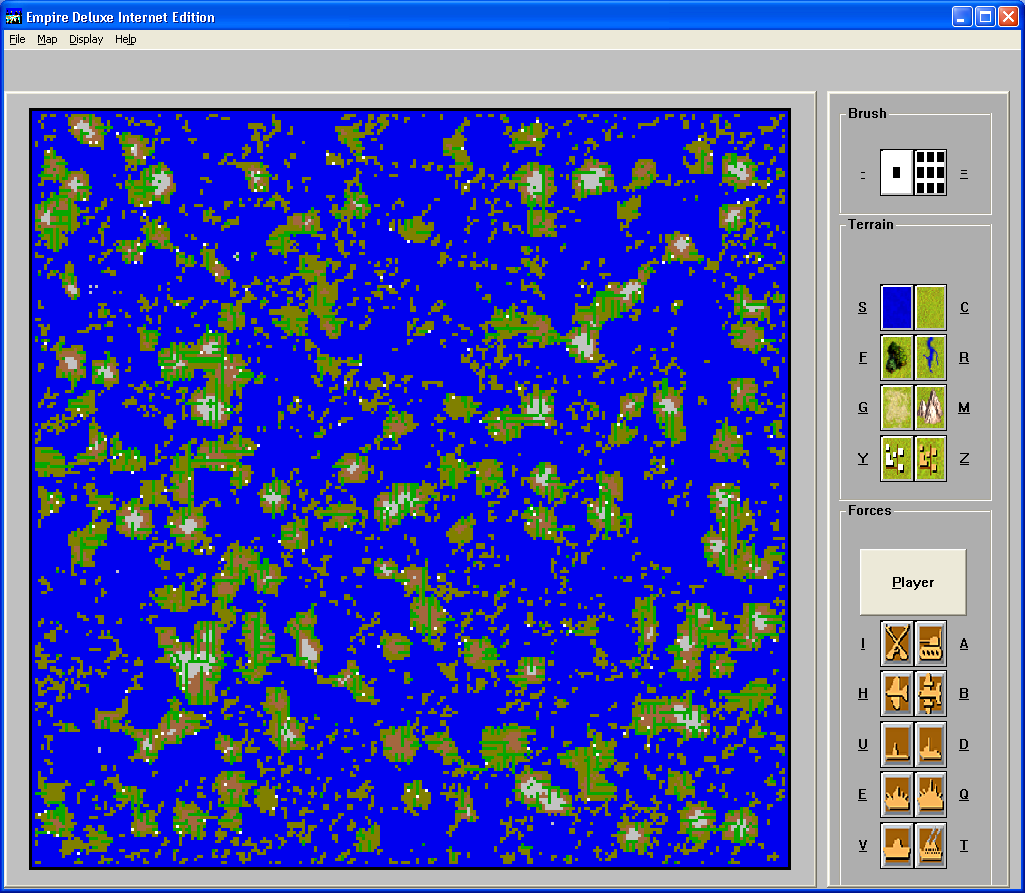
Before
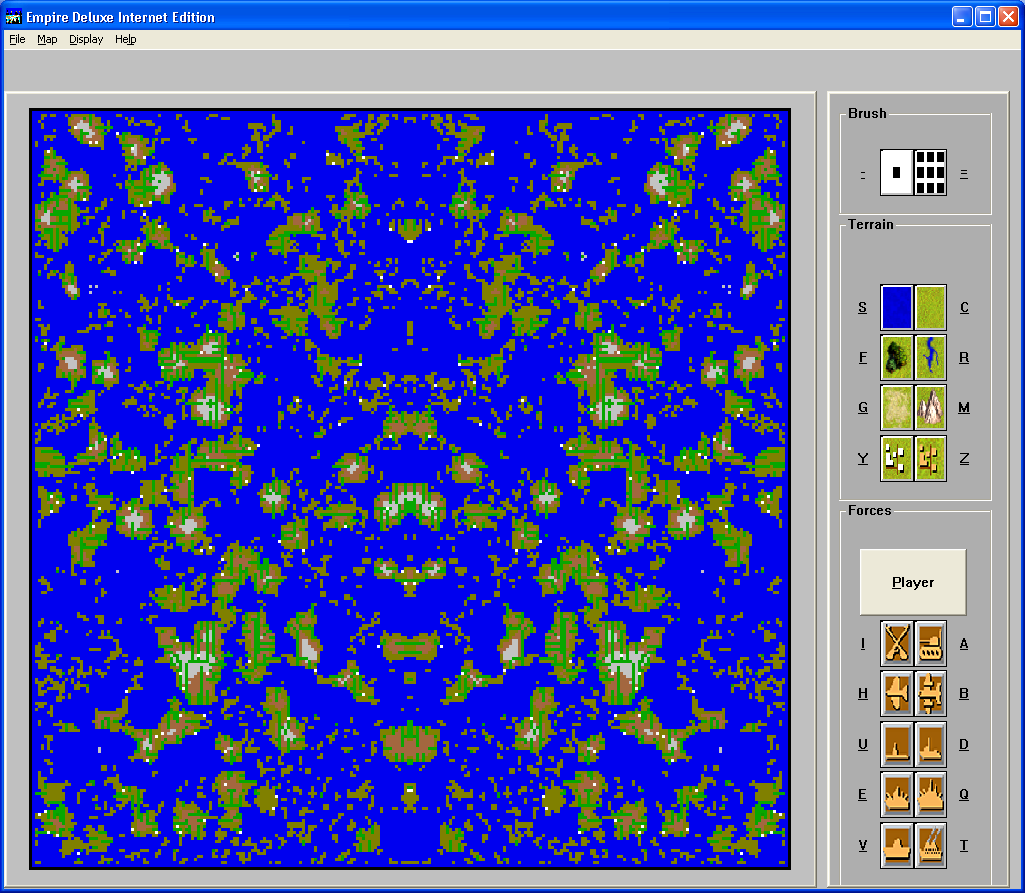
Left Half

Upper Right
Corner
Map-Cities-Remove and Replace Cities [Alt + C] –
Using this option will allow you to remove all of the cities currently on
the map, and select new City Building Factors for replacement on the
map.
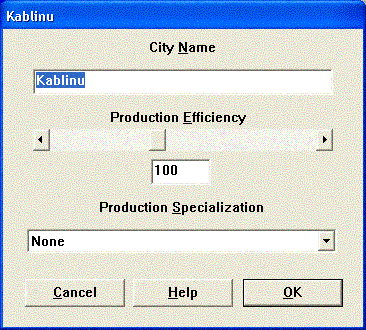
Map-Cities-Redesign Cities … [Alt + D] – Using
this option will allow you to change the city building factors on the
current cities on a map. No cities are removed or added using this option.
Once selected, a City Building Factors Dialog will appear allowing you to
edit all the City Building Factors except those related to number of cities,
as shown below:
Some City Building Factors
Map-Cities-Shakeup Cities [Alt + K] – This
option will randomly alter the location of each city on the map.
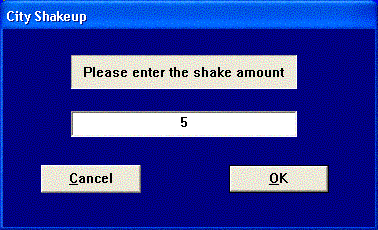
City Shakeup Setting
The user will be prompted
to enter a “shake value”, which will be used move each city. Cities are
shaken by the following procedure. A random number is generated for nine
numbered directions, with one direction representing no move, and the
other eight values corresponding to the eight adjacent squares to the
current location of the city. The city is then moved to that randomly
determined square. This process is performed the number of shake value
times. If a city does move, there is a 50% chance the old location will be
replaced by land, and a 50% chance the old location will be replaced by
sea. So if a city is shaken enough, the landscape will also be changed.
Map-Cities-Clear Cities [Alt + Z] – This option
will remove all cities from the map.
Map-Clear to Sea [Alt + S] - This option
will remove all land and city squares from the map, leaving only sea.
Map-Clear to Land Alt +
L] - This option removes all other types of terrain from the map,
leaving only clear terrain.
Map-Clear all Units
[Alt + U] - This option will remove all units from the current map and
turn player owned cities into neutrals, leaving only the terrain.
The
Display menu allows you to select how the Empire Deluxe Game Editor is
displayed for you.
Display Menu Options in the
Game Editor
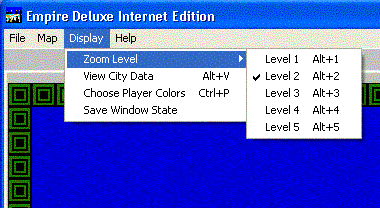
Display - Zoom Map
[Alt + 1], [Alt + 2], [Alt + 3], [Alt + 4], [Alt + 5] - Zoom map
allows the player to zoom in and out of the map. This lets you study a
small section of the map closely or a larger section of the map all at
once. There are five levels of zoom with Level 1 covering the smallest area
and Level 5 covering the largest. The default setting for a regular game is
Level 2. Note that the different Zoom Levels can be selected directly using
the hot-key sequences [Alt + 1] through [Alt + 5] for levels 1 through 5.
Display - View City Data
[Alt + V] – (Advanced Game Only) This option will toggle city data
labels on and off. These labels display the current known production
efficiency of the city, as well as indicate if the city specializes in any
type of production. The label color indicates the owner of the city. Below
is an example of a map with city labels toggled on:
Display - Choose Player
Colors [Ctrl + P] – This menu Option will allow the user to choose
between the different player colors/icons for each player position.
Display - Save Window
State – Selecting this option will preserve the current window size.
The Game
Editor uses brushes to allow you to "paint" the map you want. To use them,
select the brush size and palette options you want and move the cursor or
mouse pointer to the location you wish to paint. Clicking the left mouse
button once will paint only at that one spot. You may paint whole areas by
using holding down the mouse button. There are two different size brushes
available to you.
Small Brush [-] - The small brush takes up only one square
when painted on the map. Use this for fine adjustments.
Large Brush [=] - The large brush paints a 3 x 3 section of
the screen at a time. Use this brush for painting large areas at a time.
Terrain Palette
The
terrain palette allows you to paint terrain squares onto the map. After
selecting the brush size you wish to use, select the terrain you wish to
paint onto the map. The keystroke commands for each of the eight types of
units are listed below. Selecting Player city will allow you to place
cities on the map that the selected player will own.
Water [S]
Clear [C]
Forest [F]
River [R]
Rough [G]
Mountain [M]
Neutral City [Y]
Player City [Z]
Forces Palette
The forces
palette allows you to paint units onto the map to create a particular
scenario. Units may not be placed in locations that they cannot normally
enter.
Player [P] - The
Player button will call up a list of the six players available in the game
and their colors. You may use this option to change the color, and thus
ownership of the player cities and units you are painting on the map.
Below is
a list of the keystroke commands used to select the forces brush. Infantry
units will become Army units if you are playing the scenario using the
standard rules. Note: There is no palette selection for an Airbase. Place
two Infantry units in the same square to create an Airbase.
Infantry [I]
Armor [A]
Fighter [H]
Bomber [B]
Submarine [H]
Destroyer [D]
Cruiser [E]
Battleship [Q]
Carrier [V]
Transport [T]
To add
an AIRBASE on to the map, first add an Infantry or Armor Unit, then
click left click on that unit with the infantry or armor palette button
selected.
To place
units in a city (all units), transport (land units only) or airbase (air
units only), select the appropriate unit from the palette, then left click
on the unit or airbase.
The Empire
Deluxe Game Editor allows you to name each unit and city located on your
created map. To do this, unselect the brush you are using. Move the cursor
over the unit or city you wish to edit and select it. If you selected a unit,
a requester box will pop-up with the current name of the unit. Type the new
name into the name box in the requester and click OK to accept or
Cancel if you changed your mind. If you have selected a city, you will
also be prompted by a requester.
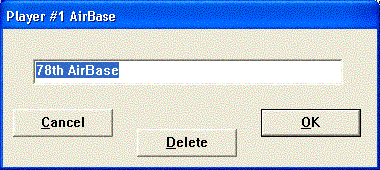
Naming a Unit in the Game
Editor
You can not only change the
name of that city using the requester, but that city's Production Efficiency and
Specialization, as well. Production Efficiency can be set to a maximum of 250%
and a minimum of 1%.
Setting City
Attributes in the Game Editor
Table Of Contents
© 2018 Killer Bee Software
|