|
This section of the
manual describes how Empire Deluxe Internet Edition is actually played
and covers various aspects of the interface. It will explain which buttons to
push and which menu options to select to accomplish what you desire. The
descriptions assume the user is using a mouse but hot key selections are also
included in brackets for each decision. If you select a choice that is not
available under the circumstances, the computer will ignore the choice and give
you a warning beep.
When you start a
game of Empire Deluxe Internet Edition you will be greeted with an
introduction screen. There are five main menu options for you to choose from:
Play Game - This option will
allow you to start playing a game of Empire Deluxe Internet Edition. Use
of this option is what we will be discussing in this section of the manual.
Game Editor - This option will
allow you to use the game editor for Empire Deluxe Internet Edition. For
more information on the game editor see the chapter Using the Game Editor.
Player History - This option
will allow you to study the player history section. For more information on
this option see the chapter - Viewing the Player History.
Quit Game – This option
will end this session of Empire Deluxe Internet Edition and exit you out
of the program.
Help – This option will
allow you to make various adjustments to certain aspects of the game, changing
preferences, accessing the manual, and viewing the credits. For more information
on this option, see the chapter – Using the Help Menu.
After you have
selected Play Game, you will see the Play Game menu options. This menu gives you
another set of options to choose from.
You may start a new
game of Empire Deluxe Internet Edition by selecting any of the following
options:
Basic Game - Choosing this option selects the basic game rules for play of the game
and will continue your game start sequence by taking you to the Basic Game
Player Selection menu.
Standard
Game - Choosing this option selects the standard game rules for play and
moves the player to the Player Setup menu.
Advanced
Game - Selecting this option is used for playing a game using the advanced
game rules. It will take you to the Player Setup menu.
Advance
Game, Secure PBM Start – Selecting this option will allow you to set up a
Secure PBM Game. Secure PBM games retrieve the passwords of all players
involved before initializing the game. See the chapter – Secure PBM Games.
Load Saved
Game
- This button will call up the File Requester so that you may recall
a previously saved game. More information on the File Requester is given in the
Using the File Requester section of this chapter. After you have recalled a
saved game that uses the Advanced Setup options, Empire Deluxe Internet
Edition will prompt you with the Player Setup menu. This will
allow you to change the player options for a game already in progress.
Remote Slave - Remote slave
will bring up the options for playing against someone on a different computer
with your machine being a slave machine. When playing with more than one
computer, one must be the Master while all other machines will be designated as
slaves. For more information on Remote Slave see the chapter - Playing with
Other Computers.
If you have chosen
the Basic game, you will be asked to wait while the computer generates a world
for you play on. The time it takes for the computer to generate a completely
new world will depend on the speed of the computer you are playing on. You may
watch the progress of the world generation by watching the growing bar in the
window. Once a new world has been created for you, you will be given several
options from the Basic Game Player Selection Menu.
Person vs.
Computer
- Choosing this option will start you into a game against one computer
controlled opponent.
Person vs. Person - This
option will start a game with two human players and no computer controlled ones.
Advanced
Setup Options
- Selecting this will take you to the Player Setup Menu. This menu will
allow you more control over the type and number of players you may have in the
game. (described below)
Cancel - The
cancel option takes you out of the play section of Empire Deluxe Internet
Edition and returns you to the introduction screen..
Help - Calls
up this manual.
If you chose to play
a standard or advanced Game, you will immediately be greeted by another set of
choices from the World Options menu.
>
World Options Menu
World Options Menu
Generate
Random World V 3.11 - This option should be used if you desire to use the original
world building function released with the 1990’s version of Empire Deluxe.
Selecting this option will take you to the Map Size Screen.
Generate
Named World
- This option will generate a random, wrap around world with random dimensions.
You will first be asked to name the world that you wish to play on. A named
world may be called up later and used for any new game you wish. The computer
will not generate a name for the world; you must give it one. There are two
buttons on the naming window. After you have named the world, you will be asked
to wait while the world is generated. You will then be given the Player Setup menu.
Generate
Random World V 3.5 - This option should be used if you desire to use the original
world building function released with the 1990’s version of Empire Deluxe,
but tweak the input variables to build a different type of world. Be aware
that the original function was not designed to have its variables ‘tweaked’, so
results may not always be as intended. Selecting this option will take you to
the Map Size Screen.
Generate
Random World With DLL – This option will allow use to use a third party DLL
o build an Empire Deluxe Internet Edition world. This DLL must be
prepared and installed before the program is started. Please refer to the
chapter - Building Your Own Worlds. Selecting this option will take you
to the Map Size Screen.
Load World
Map - Allows you to load a specific pre-generated map to play on. After you have
selected the map you wish to play on you will see the Player Setup Menu.
Load Game
Scenario
- This allows you to load a specific pre-generated scenario to play in. After
you have selected the scenario you wish to play you will you will see the
Player Setup Menu.
Since scenarios
are set up with a given number of players, some of the players on this screen
may be ghosted/unavailable. Saved game files have the extension “svg”. Saved
scenario files have the extension “scn”. Saved map files have the extension
“map”.
Map Size Screen
The Map Size Screen.
The Map Size
screen, as pictured above, shows a graphical representation of the dimensions of
the map you will be playing on in its center, plus the physical dimensions of
the map in the Map Height and Map Width boxes. The standard game default for a
random map is 60 x 100. You may resize the map to whatever specifications you
want by moving the sliders located to the left of and under the graphical
representation. As you move them, you will see the graphical representation and
values change. These sliders may be moved using either the mouse or the arrow
keys. There are 4 buttons on the Map Size screen.
Wrap - Selecting wrap allows
the game to be played on a wrap around map. The default for this button is off.
Cancel - Quits out of the Play Game section and exits the player back to the
Game Options menu
Help
- Opens the manual.
OK
- Accepts the currently chosen options and proceeds.
After you have
selected OK, you will be asked to wait while the computer generates a
map. When the map is completed, you will be presented with the Player Setup
Menu.
If you have
chosen the advanced setup options in the Basic Game or chosen Standard/Advanced
game you see another series of choices from the Player Setup menu. A selection
table will appear that will allow you to customize what each type of player will
be in the game. The Player Setup Menu is shown below:
The Player Setup Menu
You may use the up
and down arrows or mouse to select the player number you wish to customize. Use
the mouse or hot keys to select the option you wish to change. Pop-up menus
will give you a list of the choices available to you.
Player Type- This chooses the
type of player that player number will be. Clicking on this option will call up
a pop-up menu with the choices available to the user.
Person - Local - Selects
that player to be a human player that will be playing on that computer.
Person -
PBM
- Selects that player to be a human player who will participate in a game via
E-Mail.. The game will automatically save after each player's set of turns, so
that the file may be transferred to another computer for the next player to
play. If you are playing in this mode, you will be asked to provide a password
that you must enter at the beginning of each turn. This is so your opposition
doesn't accidentally see your screen or give orders to your units. If one
player is selected as PBM, there can be no “IP” players (see below).
Computer -
Easy - This option selects that player to be controlled by the computer.
The computer at this level will not play very intelligently.
Computer -
Standard - This option selects that player to be controlled by the
computer. The computer at this level will try harder.
Computer - Expert - This option selects that player to be
controlled by the computer. The computer at this level will try very hard.
Inactive - This option will only appear if more than two players
have already been selected. It will unselect that player from the menu,
removing it from playing in the current game.
Person – IP
# 1 –
Person – IP
# 2 –
Person – IP
# 3 –
Person – IP
# 4 –
Person – IP
# 5 – Selects the player to participate over a network or the Internet. You
can have up to Five different Internet locations to connect to in one game (one
per player slot). Each IP Position has its own IP address and port. These
can be set with the “Set” button that appears by the player when IP Position is
selected, as shown in the following picture:
The Set IP Button
Selecting
Set IP allows you to set the IP address and Port number of the remote slave
that will play in that position. For more details, see the chapter -
Playing with Other Computers. Several players can hot seat on the other end
of a network connection, so the same IP position can be used in different player
slots.
Color
- This option allows the user to change the color of that player to another
color. You may select the color by using the mouse or pressing the
corresponding number key.
Handicap
(Production/Combat)
- This option allows you to handicap that player by increasing/decreasing the
amount of time it takes that player to produce units, or increasing/decreasing
the combat odds for that player, thus making it easier/harder for that player to
win. Players with an advantage will have their units produced faster (for
production advantages) and will have greater luck in combat (for combat
advantages). In addition, a player with a combat advantage 3 will always win
against neutral cities.
This feature can be used to balance a game with both experienced and
inexperienced Empire Deluxe Internet Edition players in it. The choices
range from the following:
Set Value: This is a value you enter, ranged between 1 and 500.
With 100 as the middle range, a value of 1 is very helpful to a player, 500 is
most hurtful.
Advntg 3: (value = 25) – four times
normal production or combat efficiency
Advntg 2: (value = 50)
Advntg 1: (value = 75)
None: (value = 100) - Normal production
and combat efficiencies
Slight: (value = 110)
Moderate: (value = 125)
Average: (value = 150)
High: (value = 175)
Severe: (value = 225)
Extreme: (value = 300) – three times
slower production times or one third normal combat efficiency.
Cites WILL
NOT Reveal Capture – This checkbox appears for the Advanced Game only.
Keeping this checked means that changes in city production efficiency are hidden
from enemy players. Therefore, there is no indication to players that a city has
been captured due to falling efficiency. This was a ’bug’ in version 3.11, but
was requested as an option for 3.5 because some players had gotten so used to
using it. It is recommended this box remain checked. It can only be set at the
beginning of a game.
Cancel - Cancel exits out of the Play Game section and returns you to the
main window.
Help
- Calls up the manual.
OK - Choosing this option keeps whatever customization options you may have
made and starts the game.
Once you have
started a game, each player in turn will be asked for the name of that player.
If that player has played before, their name may appear in the name box. You
may enter any name in the name box up to 12 characters long. Empire Deluxe
Internet Edition will use your name to keep track of your progress in the
Player History.
After you have
entered your name, you will be given a pop-up production information window
for your starting city. If you are playing a created scenario, you may be given
several cities to select production for. More details on pop-up information
windows are given later in this section. After you have made you production
choices for the beginning of the game, you will then have the full game screen
available to you. An example of a game screen is shown below:
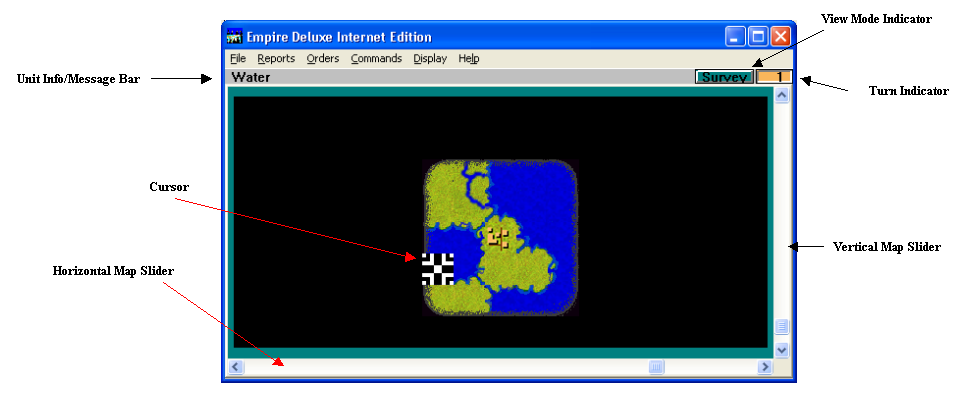
Sample Game Screen
Unit Info/Message Bar
- At the top of the screen is a multi-purpose bar. What is displayed in
this bar will depend on what the player is currently doing.
Unit Info - the top bar
on the screen will supply information on a unit that is currently selected
for giving orders. The information given is:
Unit name
Range - How much
farther that unit may move that turn. This number will be followed by a
hash mark if the unit is an air unit. The number after the hash mark
will be the total number of squares that unit may move before running
out of fuel and crashing.
Unit Orders -
The current orders that unit is operating under. For more information
on orders, see that section late in the manual.
Game Mode Indicator
- At the top left of the screen, this tells which view mode is currently
being used.
Turn Indicator - At
the top far left of the screen, this indicates what turn number is currently
being played. The color of the turn indicator tells which player is
currently taking their turn.
Map Sliders -
Located at the far left and bottom of the screen, these are used to
reposition the map to whatever area the player desires.
Map - The map lies
in the center of the screen and takes up most of it. This is the game board
you will be playing Empire Deluxe Internet Edition on. It will show
all visible terrain and units.
Cursor - The cursor
for Empire Deluxe Internet Edition appears as a set of cross hairs
one square in size. It will not appear visibly while in Orders mode. If
you are in Orders mode, the cursor is considered to be on the unit currently
requesting orders. The cursor may be moved to a new location by exiting
Orders mode and clicking on the new location or using the arrow keys to move
it around.
Information windows give information on the unit, square or city that the
cursor is currently located on. You may call up an information window by
selecting the information option from the Reports pull down menu, using
[ALT + I], or by double clicking on the location or unit you wish to have
information on. The various pop-up information windows are the Production
Information Window, City Information Window, Unit Information
Window, Terrain Information Window, and the Production Report.
Production
Information Window
Production Information
Window - This window gives information on the production of the selected
city. The name of the selected city is on the top of the window. Below
that are three columns. The column on the left gives the list of units that
city may produce. Each unit has a button that can be used to select its
production. The unit currently under production in that city will have its
button depressed. If that city has a specialization, the specialized unit
will appear highlighted.
The
middle column gives a listing of the current total number of turn it will
take to produce each unit. The far right column lists the total number of
each type of unit the player is currently producing in the game.
Selecting No Production will stop all production in that city. If
playing the advanced game, when the user selects No Production the
small “Set” button appears, as shown below:

“Set” No Production Button
Selecting the Set button brings up the following Production Alarm
Setting Dialog:
Production Alarm Setting Dialog
Here
you can set the production efficiency you wish to be notified of when
reached. If there is already a value set, it will appear in the text box. If
the value set or default setting has already been passed for this city, the
text box will be blank. You must enter a number greater than the current
production efficiency, select No Alert to not be notified, or select
Cancel to not change the alert setting. The default setting for
Production Alerts is set in the User Preferences Dialog [Ctrl
+ U].
There are two other
buttons on the City Production Window.
City - This takes
you to the City Information window.
OK - Exits the
window.
City Information Window
City Information -
This window gives information on the city selected. In the lower half of
the screen is given the location of that city by grid coordinates. Below
that is an information box containing the name of the city, what unit it is
currently producing and how many turns it will take to complete that unit.
If you are playing the advanced game, the Production Efficiency of the city
and the type of unit it is specialized in will also appear. If the city in
question is not owned by the player, its production will not appear in the
information box. Up to five buttons will appear on this window.
Add Waypoint/Edit
Waypoint – allows the player to create/edit a waypoint at this location.
See the chapter – Waypoints.
Rename - You may
change the name of the city. The name will be effective as soon as the
information window is closed.
Units - This button
will only appear if there are units located in that city and the city is
owned by the current player. Selecting this button will take you to the
Unit Information window.
Production - This
button will not appear if the current player does not own the city.
Selecting it will take the player to the Production Information window.
OK - Exits the City
Information window.

Unit Information Window
Unit Information -
This window gives information on the selected unit. If there is more than
one unit at that location, you will see a list of all units in that square.
After you have selected the unit you wish to view you will be given the Unit
Information window.
In the
lower half of the screen is given the location of that unit. Below that is
an information box that holds that unit's name, current orders and current
accumulated damage total. If the owning player is not the one requesting
information on the unit, only the name of the unit will appear. Three
buttons may appear in this window.
Add Waypoint/Edit
Waypoint – allows the player to create/edit a waypoint at this
location. See the chapter – Waypoints.
Rename - You may
change the name of the unit. The name will be effective as soon as the
information window is closed.
City - This button
will appear only if the unit selected is a friendly unit located in a city
square. This button will take you to the City Information window.
Orders - This
button will appear only if the selected unit is friendly. Clicking on
this button will take the player to the Orders window.
OK - This button
will exit the Unit Information window. If there are other units in the
same square, you will be returned to the list of available units.

Terrain Information Window
Terrain Information
- This window will give information on a selected terrain square. In the
lower section of the window will appear the square's location. Below that
will be an information window with the type of terrain listed. There are
two buttons on the Terrain Information window.
Add Waypoint/Edit
Waypoint – allows the player to create/edit a waypoint at this
location. See the chapter – Waypoints.
OK - Selecting
this will exit the player from the Terrain Information window.
Production Report Window
Production Report -
The production report window is the only information window that cannot be
selected by the player. It will appear automatically whenever the player
produces a new unit. At the top of the window is the city doing the
production and the unit it has just produced. Below that is an entry screen
for the name of that unit. There are four options in this window.
Rename - The
computer will automatically select a name for the new unit. If you wish
to change the selected name, choose this option.
OK - This option
accepts the current settings and exits the window.
Help - Calls up
the Help window.
Production -
Accepts the current settings and takes the player to the City Production
window for the producing city.
The
production report window can be turned off for Land, Sea or Air units in the
User Preferences Screen.
The
primary means of choosing options in Empire Deluxe is through pull down
menus or their hot key equivalents. There are several sets of pull down menus
each explained here after.
This menu
gives access to the various file manipulation controls in the game. There are
five options under the File Menu.
File-Save
The save
menu has several options:

File and Save Menus
File-Save-Game
[Ctrl + S]- This option calls up the File Requester so that the
game may be saved at any time. For more information, see the above
section on Using the File Requester.
File-Save-Scenario
- This saves the current game as a Scenario, saving the map and all
currently held cities and units. You will be presented with the
Scenario Definition window, which allows you to set further rules for
the scenario. This option is only available when all the players are
local to the computer (i.e. – no networked or PBM players).
File-Save-Map
- This will save the current world in which you are competing as a Map,
to be played again in a subsequent game, or modified in the Game Editor.
This option is only available when all the players are local to the
computer (i.e. – no networked or PBM players).
File-Save-Turn
State Dump – Players are able to make an ASCII text file of their
current game state at anytime during their active turn (while in orders
mode, not in survey mode). The format of the file is self descriptive.
In the preference menu, players can select “Auto State Dump”, which will
automatically create the file once at the beginning of each turn, and
once at the end. Use this auto-option sparingly, it will fill your hard
drive quickly.
File-Save-AutoSave
- This will cause the game to save automatically at the end of each
humans turn. The game will be saved in the file "AUTOSAVE.SVG" in the
directory "SVGAME".
File-Resign
[Ctrl + R] - You may select this option if you wish to resign from a
game. Since resigning the game means losing, you will be asked to
confirm your choice. If playing a network game, once you have
resigned, you may stay online and chat.
File-Abdicate
[Ctrl + A] - You may select this option if you wish to let the
computer player play for you. Since abdicating the game means losing,
you will be asked to confirm your choice. If playing a network game,
once you have resigned, you may stay online, chat, and watch the
computer player do a better job.
File-Exit
[Ctrl + X] - This selection allows you to exit the current game and
return to the Game Options menu. You will be presented with four
choices after selecting this option.
Save Game and Exit
- You may save the game and then exit to the main window.
Exit Current Game
- Allows the player to leave the game and then exits to the Game
Options menu. Any changes made to the game since you last saved will
be lost.
Cancel - Do Not
Exit - Cancels the selection of the Exit button and returns you to
the game.
Help - Calls
up the manual.
File-Quit
[Ctrl + Q] - This option is identical to the above Exit option
except, rather than exiting the game and returning to the Game Options
menu, Quit will take you completely out of Empire Deluxe Internet
Edition. The same four buttons occur.
Save Game and Exit
- You may save the game and then exit to the main window.
Exit Current Game
- Allows the player to leave the game and then exits to the Game
Options menu. Any changes made to the game since you last saved will
be lost.
Cancel - Do Not
Exit - Cancels the selection of the Exit button and returns you to
the game.
Help - Calls
up the manual.
If
during a network game a player that Exits or Quits without first
resigning or abdicating, the other players of the game will be prompted
to immediately save the game, then exit to the main window.
The
Reports Menu lists the types of reports that can be called up in Empire
Deluxe Internet Edition. These reports, like the pop up information
windows, are designed to give the player information that will help the player
during the game. There are ten selections under the Reports Menu.
Reports Menu
Options
Reports-Status Report
[Alt + S] - Selecting this option calls up the Status Report shown
below.

Status Report
The top portion of the
Status Report displays
·
The total number of cities that player currently owns in
the game, a.k.a. Captured.
·
The total number of cities known to exist on the map, from
the player’s perspective, a.k.a. Known.
·
The Cities Conquered over the course of the game.
Note that this is different from Captured.
·
The Cities Lost during the course of the game.
·
The current Base Production Efficiency rating for
the player, See Unit Support/Resource Drain in the
Advanced game rules for more info.
·
The current base Combat Efficiency, which is
affected by the handicap settings made at the start of the game.
·
The percentage of the map that player has explored, a.k.a.
World Explored
In the middle portion of
the screen is information on the player's overall production and forces.
To the lower left of the report is a column of each of the units available
in the game. To the right of this column are several other columns
containing information relevant to the units listed on the left.
The Under
Construction column lists the total number of that type of unit
the player is currently producing.
The Soonest
Complete column lists the number of turns before the next unit
of that type will be produced.
The Are in Combat
column list the number of that type of unit the player currently has
on the board.
The We've Killed
column lists the total number of that type of enemy units that the
player has destroyed.
The We've Lost
column lists the total number of that type of friendly units
destroyed.
The right portion of the
screen displays various combat statistics regarding the combat rounds you
have experienced in a game against your opponent. Note that these
statistics are for the combat round probabilities, not for an entire
battle. See
APPENDIX IV - COMBAT
MECHANICS for more details. These are:
Avg Att Rnd Prob
(Average Attacker Round Probability): This is the average combat
round probability that you have experienced as an attacker.
Att Rnd Won
(Attacker Rounds Won): This is the total number of combat rounds you
have won as an attacker (attacks versus neutral cities not included).
Att Rnd Lost
(Attacker Rounds Lost): This is the total number of combat rounds
lost as an attacker (attacks versus neutral cities not included).
Avg Def Rnd Prob
(Average Defender Round Probability): This is the average combat
round probability that you have experienced as a defender.
Def Rnd Won
(Defender Rounds Won): This is the total number of combat rounds you
have won as a defender.
Def Rnd Lost
(Defender Rounds Lost): This is the total number of combat rounds
lost as a defender.
The
Units Available Before Possibly Suffering Resource Drain specifies
how many units are still available to be produced before the Base
Production Efficiency is affected. (Advanced game only). See
Unit Support/Resource Drain in the
Advanced game rules for more info.
Exit - Exits the
Status Report and returns the player to the game.
Reports-City
Status [Alt + C] - Selecting this option calls up the City Status Report
shown below.
City Status Report
The City Status report displays the cities that the player currently
owns. The city name, production efficiency (Advanced Game Only),
Specialization (Advanced Game Only), current Production, number of turns to
completion, and location are displayed in columns. Each column may be sorted
in ascending or descending order by left clicking on the column header.
This
report may be minimized for the player to be able to view the map, but the
map will be disabled while the City Status report is open. Selecting
the View Production button allows the player to view the City
Production Information Window. Selecting the On Screen button
will adjust the map view so that the city is visible and the cursor is at
its location. Exit will close the City Status report.
Reports-Unit
Listing [Alt + U] – Selecting this option calls up the Unit Listing Report
shown below.
Unit Listing Report
The
Unit Listing report displays the units that are currently controlled by
the player. The Unit Name, Unit Type, Orders, Damage Taken, Movement Points
Left, Remaining Range, Load Amount, special location (City, Carrier or
Transport), and Location are displayed in columns. Each column may be sorted
in ascending or descending order by left clicking on the column header.
To
filter out some of the units, the player may select the Hide Land, Hide
Air, or Hide Sea buttons to toggle the display of Land, Air and
Sea units respectively. Selecting the Bring On Screen button will
adjust the map view so that the unit is visible and the cursor is at its
location. The view Info button allows the player to examine the
Unit Information Window for that unit. Done closes the Unit
Listing report.
Reports-Waypoints [Alt + W] – Selecting this option calls up the
Waypoints Report, shown below.
Waypoints Report
The
Waypoints report displays the waypoints currently set by the player. The
location and associated text are displayed in columns. Each column may be
sorted in ascending or descending order by left clicking on the column
header.
The
On Screen button will adjust the map view so that the Waypoint is
visible and the cursor location is at the Waypoint’s location. The View
Info button will allow the player to look at the information window
where the waypoint is set. The Delete button will remove the
waypoint. Done will close the Waypoint report.
Reports-Information
[Alt + I] - This option will call up a pop-up information window that is
appropriate for the location of the cursor. Look up section
Information Windows for a description
of the types of Information Windows.
Reports-Production Map
[Alt + P] - Selecting this will take you into production game mode.
When in this mode, the icons for all units will disappear from the map and
cities will appear as the icons for the type of unit they are currently
producing. Placing the cursor over a city will reveal the city's name, the
unit type being produced and the number of turns remaining to produce it, in
the Message bar. Double clicking on a city will immediately bring up the
Production Information pop-up window. Exiting this mode by going to any other
mode will return the view to normal. This command is excellent for making
large scale changes in your overall production structure and seeing just what
units are being produced where.
Reports-Area Combat Report
[Ctrl + M] – Like a Full Combat Report described below, except
that only the events that occurred within the current map viewing area will be
replayed. The report can be stopped by Right-Clicking the mouse or pressing
the [SHIFT] or [ESC] keys.
Reports-Full Combat Report
[Alt + M] - If your opponents are all computer controlled players, you
will be allowed to see every battle initiated against your units by each of
the other players. If any of your opponents are human in a PBM setting, you
will not see this in between turns. Selecting Full Combat Reports allows you
to watch all battles that were initiated against you during other players'
turns. It will only show battles that have occurred since your last turn. If
there was no combat, this option will be disabled. The report can be stopped
by Right-Clicking the mouse or pressing the [SHIFT] or [ESC]
keys.
Reports-Area Recon Report
[Ctrl + N] - This command functions similarly to the area combat report
option. Instead of showing you all battles that took place during the last
turn, however, you will see all sightings of enemy units that had occurred.
The report can be stopped by Right-Clicking the mouse or pressing the
[SHIFT] or [ESC] keys.
Reports-Full Recon Report
[Alt + N] - This command functions similarly to the combat report
option. Instead of showing you all battles that took place during the last
turn, however, you will see all sightings of enemy units that had occurred.
The report can be stopped by Right-Clicking the mouse or pressing the
[SHIFT] or [ESC] keys.
This
menu is probably the most important menu for playing Empire Deluxe
Internet Edition. As such, more time will be spent on this than other
sections.
Giving
units orders is the only way to move them about the map and thus conquer the
world. Each unit can execute only one order at a time. If a unit is
currently executing one order and is given a new one, it will disregard the
first order in favor of the new one. Units will follow given orders until
they receive new orders, they are interrupted, or they have finished
completing their orders. Completing orders can take less than one turn or
as long as the rest of the game, depending on the orders given. A unit will
have its orders interrupted when it can, for whatever reason, not complete
them; when it has been attacked by an enemy unit; or when it is next to an
enemy unit. A unit will always request new orders as long as it is next to
an enemy unit and still has movement remaining in that turn. A unit that
has no place it can currently move to will not request orders. A unit that
is temporarily prevented from carrying out its orders, usually because it is
being blocked by another unit, will request orders for that turn only, but
will retain the previous orders given as long as the new orders do not
require it to move more than one square.
During a
player's turn, after he has decided his production, each unit that does not
currently have orders will, in turn, request orders. A unit requesting
orders will appear on the screen, flashing. A message will also appear in
the Message bar telling the player which unit is requesting orders. When a
player issues orders to a unit, that unit will immediately begin carrying
them out, as long as it has not yet reached its full Move. The player's
turn ends after all units have orders. If a player has all their units on
orders that will last for several turns, it is possible for a player's turn
to end without them ever issuing new orders.
IMPORTANT: If the computer
is executing orders for your units, and you wish to break in, the [ESC]
or [SHIFT] keys or Right-Clicking the mouse will allow this to
happen.
If you
do not wish to issue any of the specific orders listed below to a unit, you
may move that unit one square at a time by clicking on the square you wish
them to move to with the mouse or using the arrow keys or numeric key pad.
This method is the best way to order a unit to attack another unit.
There
are 12 options under the Orders menu, as shown below.
Orders Menu Options
Orders-Move To [T] -
This option will allow you to order a unit to move to a particular
location. When you issue this order a dotted line will appear around the
subject unit. This line is called the path line. You may stretch the path
line to the location you wish the unit to move to by using the mouse or
cursor keys. You may also give this command to a unit that is requesting
orders, by holding down the left mouse button until the path line appears,
then dragging the path line to the desired location and letting up on the
button. A unit ordered to Move To a location it cannot move to, will
disregard the order. Once ordered to Move To a location, a unit will take
the fastest possible route it can to that location. If there are multiple
routes to that location, each taking the same amount of time, one will be
chosen at random.
When in
the process of giving a Move To order, the player may check the route the
computer will chose. To do this, either hold down on the right mouse button
while holding down the left at the same time, or by keyboard, hitting the
space key.
Orders-Move To [Y]
–This option will allow you to move a unit towards a location that has a
waypoint. Upon selecting this option, the Waypoints listing will
appear. The player selects a Waypoint with a left click, (right click
de-selects), then selects the Done button. The user may also double
click on the waypoint in the Waypoints listing and the Waypoints
window will be automatically close. After the Waypoints listing is
closed, the unit will move towards the waypoint’s location.
Orders-Patrol
[P] - This option allows you to tell a unit to patrol -- move back and
forth constantly -- between its start location and a selected end location.
The patrol route is selected using the path line as described under the Move
To order. It is, however, possible to set up a multi-leg patrol path of up
to 16 legs. Drag the path line to the location of the of the first
destination square. A dotted box will appear around the square. Draw
another path line from that square to the second Way Point, and so on. The
final leg of any patrol path must always end at the same square that the
unit originally started its patrol from. The starting location in the
patrol path of an air unit must be located in a square that the air unit may
refuel at. If a Carrier is used in the patrol path, the path will move with
the Carrier.
Ranged aircraft can refuel in bases,
carriers (fighters only of course), and cities while on patrol to increase
range. It is the responsibility of the user to add patrol legs that make
sense in setting up air patrols. Movement lines are not limited to the range
of an aircraft. If you place a patrol leg you wish to erase, press escape
[ESC].
Orders-Go Home
[H] - This command orders a unit to move to the closest friendly city --
or airbase or carrier for air units -- it can reach. If there are multiple
cities, equidistant, one will be chosen at random.
Orders-Explore
[X] - A unit issued this command will immediately begin exploring all
unexplored terrain it can get to. It will move in a manner that will
maximize the amount of terrain it can explore. If there is no unexplored
terrain within reach, or at least a reasonable number of turns away, the
unit will disregard this order. Land units that come adjacent to neutral
cities while exploring will ask for new orders.
Orders-Escort Ship
[E] - This order allows a friendly ship to escort another friendly
ship. It may only be given to sea units. The ordered sea unit is the one
that will be doing the escorting. To select the ship it will escort you
must move the path line from the ordered ship to the target ship. A unit
escorting another ship will follow the escorted ship about to the best of
its abilities.
Orders-Sentry [S]
- Putting a unit on sentry tells that unit simply to stay put and not
request any more orders until it is given new orders or is interrupted. Air
units may not be ordered to Sentry unless they are at some place they may
refuel at. The background of the icon for a unit that has been given the
Sentry order will turn light gray for as long as it is performing that
order.
Orders-Load Ship [L]
- This order may only be given to Transports. If the transport is in a
city, a requester listing all land units also in the city will appear.
Select those units you wish to load onto the transport from the list. Note
that a transport leaving a city without first selecting the Load Ship
command will automatically load as many land units as possible.
If the
Transport is not in a city when ordered to load it will not move or request
orders. Any land unit that moves next to a Transport that is loading, will
automatically have its orders changed to Move To the Transport. Once a
loading Transport has loaded the maximum number of units it may hold on it,
it will request new orders. Any land unit that loads onto a Transport is
automatically, and immediately given the Sentry order.
Orders-Use/Unload Ship
[U] - This order may only be given to a loaded Transport but applies
to the units on it. All land units on that Transport will be taken off
Sentry orders and will immediately ask for new ones, as long as there is
someplace for that unit to go. Unload may also be used to clear orders for
Fighters that are on Sentry on a Carrier.
The
Unload command has a secondary function of being used in the advanced game
to order an Infantry unit to transform into an Airbase. Airbases can only
be created in Clear terrain. When you give an Infantry unit this order, you
will be prompted to confirm your decision since it will be irrevocable.
After you have confirmed the order, the Infantry will turn into an Airbase
at its current location.
Orders-Clear Orders
[Insert] - This order simply cancels any currently standing orders
that unit may have, allowing it to be more easily given new ones.
Orders-Skip Move
[Space Bar] - A unit given this order will either resume it's current
orders if it was interrupted by an enemy unit or simply sit and do nothing
for that turn if it has no orders. In the second case, the unit will again
ask for new orders on the following turn.
Orders-Disband Unit
[Del] - Disband destroys the unit, removing it from play. This
command is useful for reducing the number of units you must command and in
reducing the support production penalty used in the advanced game. Since
this command is irrevocable once given, you will be asked if you are sure
you really want to do this.
The
Commands menu allows you to enter several different modes for easier control
of certain game features. The Orders mode is the usual mode that
Empire Deluxe Internet Edition will be played in. Each mode has
restrictions on what can and cannot be done in it. The Command mode you are
currently in will appear in the game mode box.
The
default mode used in Empire Deluxe Internet Edition is the Orders
mode. This is the mode that each player will began their turn in. All the
orders described above work normally when in this mode. The cursor is
invisible while in Orders mode and is assumed to be located with the
unit currently requesting orders. Trying to move the cursor in this mode will
result in moving the requesting unit instead of the cursor.
There are
nine options under the Commands menu. The first five allow you to change
command modes.
Commands Menu Options
Commands -
Survey Mode [F6] - This mode pauses the game and allows the
player to move the map about to observe things. Orders may be given to
units in this mode and production can be changed at cities, but only by the
use of pop-up information windows. Besides the normal means, a player may
enter Survey mode by clicking on the right mouse button while the mouse
pointer is on the map or by pressing <ESC>. If you are currently in
Survey mode, you may enter Orders mode by doing the same thing.
Commands -
Group Mode [F7] - This mode is similar to Survey mode but
will allow you to give orders to several units at a time. When you select
this option a yellow box will appear on the screen. To give multiple units
orders, position the cursor over a corner of the area you wish to give
orders to and drag the box so that it covers the desired area. When you
then give an order, that order will be given to every unit within the box.
Giving the order will take you out of Group mode and put you in Orders
mode. Note that you can also enter Group mode by holding down the <Shift>
button while dragging with the mouse.
Commands -
Paths Mode [F8] - Entering Path mode allows you to set up
various paths from one city or Airbase to another location. You create a
path by clicking on the starting city and drawing a path line from there to
the destination city or location. Once you have done this you will be asked
whether you want the path to apply to land units, air units, sea units or
any combination of these. You may only have air paths if the path selected
starts or ends at an Airbase. Other types of paths may be denied you if
such units could not reach the destination selected. The color of the path
line will change depending on which type of path is selected. Once a path
has been established, all units of the type designated by the path that
enter the starting city will be given the order to Move To the destination
location.
Paths
must start in a friendly city or Airbase. The path disappears if the
starting location or the destination city or airbase are captured or
destroyed by the enemy. Paths are invisible except when in Path mode, at
which time all current paths will appear on the map.
You may
change a path at anytime by redrawing it. You may remove a path by
redrawing it from its starting location back to its starting location. An
existing path can be removed by redrawing it and then specifying that it
applies to No Land Units, No Air Units, and No Sea Units.
Paths
are most useful for shuffling back line units up to the front from their
production centers without the bother of giving each one individual orders.
Commands -
View Mode [F9] - View Mode is only available at the end
of a game or when all players in a particular game are computer controlled.
After you have won a game of Empire Deluxe, the screen will be set to
View Mode and you will be ask which player you wish to look at. You may
study the various reports, positioning, production and other aspects of any
of the other players, but may not issue orders or make any changes.
If you
are watching a game with only computer controlled players involved, you can
only do so while in View Mode. You may exit View Mode to us the Display or
File menus. If you wish to continue watching, select View Mode again.
Commands -
Resume [F10] - The Resume command changes the current game
mode back to Orders mode.
Two
options under the Command menu are commands that may only be given to
units. These commands are not true orders, as they only have a temporary
effect and do not use up movement.
Commands -
Wait [W] - A unit commanded to wait will stop requesting
orders until the end of that particular turn, after all other units have
carried out their order. This command is best used when you haven't decided
what orders to give a particular unit yet or to help relieve "traffic jams"
that may occur when too many units are trying to go to the same place.
Commands -
Activate [A] - This command, usually used from Survey
mode, makes the selected unit the very next unit to carry out its orders.
This command is most useful when you want a particular unit to move right
then. You may also activate a unit by double clicking it with the right
mouse button. Units that have already moved their full Move that turn, may
not be activated.
Commands -
End Turn - this will end the current turn for the player
without moving any more units. However, ranged aircraft units short on fuel
will need to be moved before the turn is completed. The user may be prompted
to attend to certain situations with aircraft units.
The
Display menu allows you to select how Empire Deluxe Internet Edition is
displayed for you. It has no direct bearing on the game, only on how you
perceive it. There are several different options on the Display Menu.
Display Menu
Options
Display - Zoom Map
[Alt + 1], [Alt + 2], [Alt + 3], [Alt + 4], [Alt + 5] - Zoom map
allows the player to zoom in and out of the map. This lets you study a
small section of the map closely or a larger section of the map all at
once. There are five levels of zoom with Level 1 covering the smallest area
and Level 5 covering the largest. The default setting for a regular game is
Level 2. Note that the different Zoom Levels can be selected directly using
the hot-key sequences [Alt + 1] through [Alt + 5] for levels 1 through 5.
Display - Center Screen
[C] - This display command centers the screen over the cursor or
selected unit.
Display - View City Data
[Alt + V] – (Advanced Game Only) This option will toggle city data
labels on and off. These labels display the current known production
efficiency of the city, as well as indicate if the city specializes in any
type of production. The label color indicates the owner of the city. Below
is an example of a map with city labels toggled on:
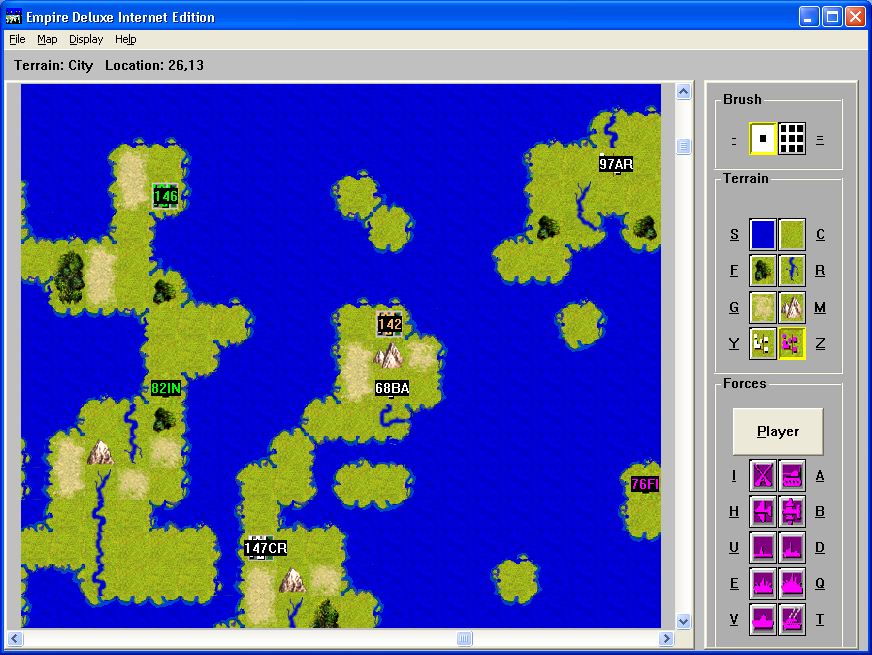
City Data Displayed
Display - View Waypoints
[Alt + Y] – This option toggles on the circular symbols for waypoints.
The waypoints are represented by a small two color circle on the map. When
the View Waypoints option is turned on, holding down [SHIFT + D]
will show the waypoint labels. Below is a simple view of Waypoints and their
labels:
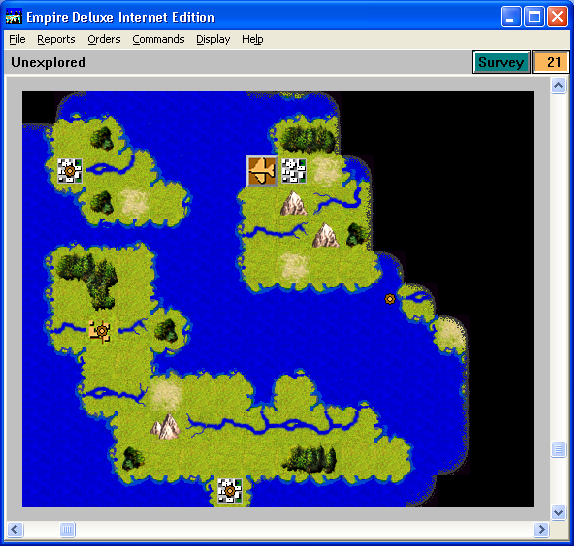
Waypoints Displayed
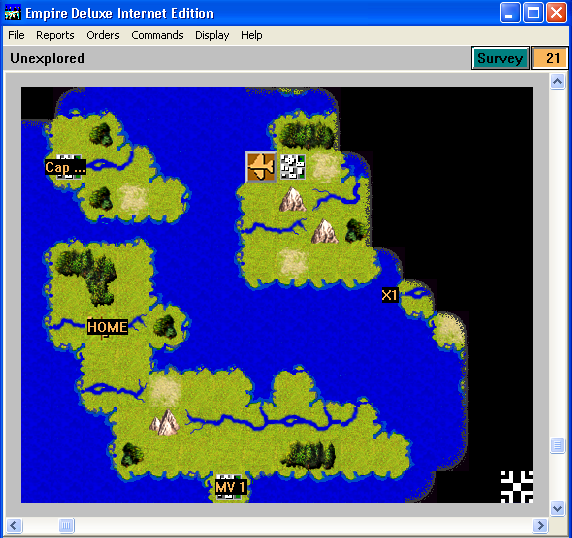
Waypoint Labels Displayed
[SHIFT + D] (held)
Display - Battle
Odds Calculator [Alt + B] – This will call up the odds calculator for the
game, as shown below:

Battle Odds Calculator
This
calculator will calculate the probability of success for the combat round of
the specified battle. This percentage value is used for the entire duration
of the battle. Combat is explained in more detail in
APPENDIX IV - COMBAT MECHANICS.
Users are able to select the Attacking Player (for handicap differences),
the Attacking Unit type, the Defending Player (for handicap differences),
the Defending Unit Type, and the Defender’s Terrain type.
Selecting Battle Results will display the possible outcomes for the
entire battle, as shown below:
Battle Results
The Battle
Odds are calculated based on 10,000 battles with a set random seed, not from
a scientific formula. The Odds for victory are calculated, as well as the
odds for victory while sustaining hits (if applicable). In the above image,
the Cruiser attacking an infantry has a 99.9860% chance of defeating the
enemy infantry. However, it only has a 65.968% chance of destroying the
infantry without sustaining any damage.
If the
Cruiser had three hits already, the odds of victory would be reduced to
99.516% (4 hits or less).
Display - User Prefs [Alt
+ U] - Selecting this option calls up the User Preferences window as seen
below:
User Preferences Window
The
Preferences Window is explained in the
CONFIGURATION
section of this manual.
Display - Prior Message
[-] – This will display the previous message in the Unit Info/Message
Bar.
Display - Choose Player
Colors [Ctrl + P] – This menu Option will allow the user to choose between
the different player colors/icons for each player position.
Display - Save Window
State – Selecting this option will preserve the current window size.
Display - Chat Window
[Ctrl + W] – This option will display the Chat Window if the current game
is a networked game. This window is further explained in the Network Play
section of the manual.
Table Of Contents
© 2018 Killer Bee Software
|